
Egyptian Baked Rice with Cream and Golden Crust (El-Moammer)
The secret to El-Moammer is that the liquid should be two and a half times the rice — hot milk, broth, and heavy cream — because it stays in the oven for about an hour and needs to turn out creamy on the inside, not dry. And never stir it in the oven at 180°C: the gentle heat and stillness are what create the golden crust without burning the bottom.
- Prep
- 15 min
- Cook
- 85 min
- Total
- 110 min
- Calories
- 475
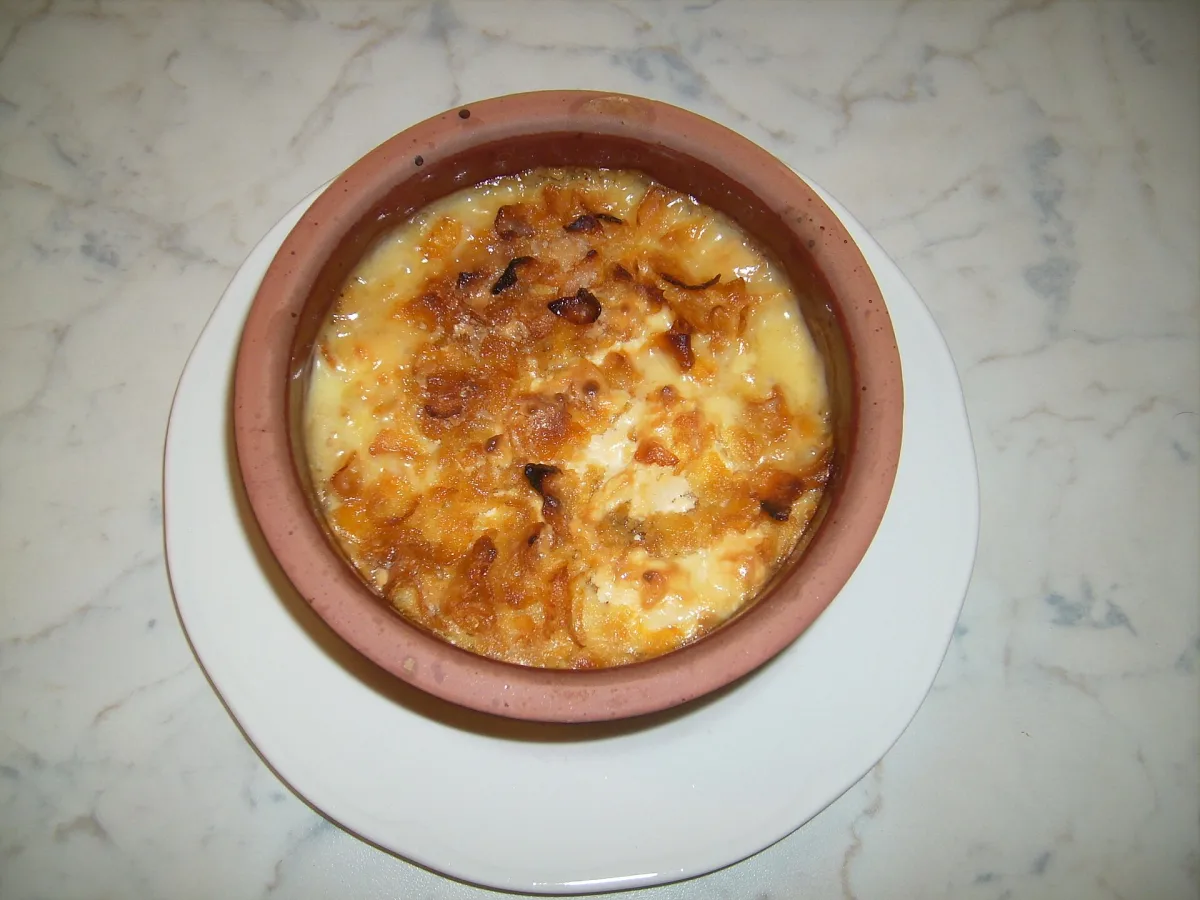
Photo: Deed89 at English Wikipedia / Wikimedia Commons · CC BY-SA 3.0 · https://commons.wikimedia.org/wiki/File:Rizbihaleeb.JPG
Baked rice (El-Moammer) is the ultimate celebratory dish in the Egyptian countryside: Egyptian rice that cooks slowly in a clay casserole (baram) with milk, broth, and cream until it becomes tender and creamy on the inside with a golden, toasted top. It is served alongside roasted chicken, duck, or squab, and this version is savory rather than sweet.
Method
-
1
Preparing the Casserole
Grease the inside of the clay casserole with ghee, place it in the oven while cold, and turn the oven on to 180°C so it heats up gradually with the oven. Clay cracks from thermal shock: if you put it into a hot oven when cold, or pour boiling liquid into it when cold.
⏱ 2 min -
2
Washing the Rice
Wash the rice only twice and drain it well for 10 minutes. Here, washing is lighter than for vermicelli rice — a little bit of the starch left on the grain is what gives El-Moammer its creamy texture.
⏱ 12 min -
3
Heating the Milk and Broth
Heat the milk and broth together in a pot until they are close to boiling, keeping an eye on the milk so it doesn't boil over. The hot liquid starts cooking the rice immediately, reducing the oven time so the bottom doesn't stick.
⏱ 6 min -
4
Sautéing the Rice in Ghee
In another pot, heat 2 tablespoons of ghee and stir the rice in it for 3 minutes over medium heat until the grains glisten and are coated. This keeps the rice grains distinct inside the cream, rather than turning into porridge.
⏱ 3 min -
5
The First Boil
Pour the hot milk and broth over the rice, add the salt and white pepper, stir, and let it simmer gently uncovered for 5 minutes. Taste for salt now — you won't be stirring again after this.
⏱ 6 min -
6
Transferring to the Casserole and Adding Cream
Take out the hot casserole and place it on a wooden board or dry towel (not on a cold countertop), pour in the rice with its liquid, and smooth out the top. Distribute the cream all over the top and dot with butter cubes. The cream creates the golden crust and slowly melts down to enrich the rice.
⏱ 3 min -
7
Baking Without Stirring
Return the casserole to the lower-middle rack and leave it for 60–70 minutes without stirring, until the top is browned with dark golden spots and the liquid has disappeared from the surface. After 45 minutes, insert a spoon at the side: if the rice is still raw and the liquid is gone, pour half a cup of hot milk down the sides, and if the top is browning too quickly, cover it with foil.
⏱ 70 min -
8
Browning and Resting
If you want a darker top, turn on the top broiler for 3–5 minutes at the end. Take it out and let it rest for 10 minutes before serving — the cream sets, the rice finishes absorbing the liquid, and the clay keeps it warm for a long time on the dining table.
⏱ 15 min
Cooked it? Rate it
Your rating tells the next cook whether this recipe is worth their time.
✓ Thanks — your rating is in.
Tips that actually matter
- If the casserole is new, soak it in water for 2 hours before first use and let it dry — this reduces cracking and prevents the clay from absorbing the rice liquid.
- The broth is the foundation of the flavor — chicken broth boiled with onions, cardamom, and bay leaves is much better than water and a bouillon cube.
- Want it with chicken? Push pieces of boiled and browned chicken down into the rice inside the casserole before adding the cream — they heat up with it and their juices release into the rice.
- Do not fill the casserole to the brim: leave 2–3 cm empty at the top so the milk doesn't boil over in the oven.
People also ask
Why did the baked rice turn out dry or mushy?
Dry: the liquid was too little, the oven temperature was higher than 180°C, or a new casserole absorbed the liquid. Mushy and liquidy: too much liquid, or the rice was stirred in the oven which released its starch. Stick to two and a half cups of liquid per cup of rice, do not stir, and test with a spoon at the side after 45 minutes.
Can I make it in a glass baking dish or aluminum instead of clay?
Yes, but clay distributes heat gently and keeps the rice warm at the table. In a glass baking dish, reduce the time by 10–15 minutes and place it on the middle rack. In aluminum, cover it with foil for the first half hour so the bottom and sides don't burn.
What is the difference between savory and sweet baked rice?
The savory version (here) uses broth, salt, and pepper, and is served with chicken and squab. The sweet version is made with milk only without broth, with added sugar (about half a cup for every two cups of rice) — and it is different from rice pudding because it is baked in the oven until the top browns and the texture is heavier.
Can I prepare it ahead of time or reheat it?
It is best made on the same day. If there are leftovers, cover it and put it in the fridge, and it lasts for two days. When reheating, pour a quarter to half a cup of hot milk down the sides, cover with foil, place it in a cold oven, and turn it on to 160°C for 20–25 minutes — the rice absorbs liquid when cold so it needs to be rehydrated, and a cold casserole should never go into a hot oven.
Cook mode
Egyptian Baked Rice with Cream and Golden Crust (El-Moammer)
-
1
Preparing the Casserole
Grease the inside of the clay casserole with ghee, place it in the oven while cold, and turn the oven on to 180°C so it heats up gradually with the oven. Clay cracks from thermal shock: if you put it into a hot oven when cold, or pour boiling liquid into it when cold.
-
2
Washing the Rice
Wash the rice only twice and drain it well for 10 minutes. Here, washing is lighter than for vermicelli rice — a little bit of the starch left on the grain is what gives El-Moammer its creamy texture.
-
3
Heating the Milk and Broth
Heat the milk and broth together in a pot until they are close to boiling, keeping an eye on the milk so it doesn't boil over. The hot liquid starts cooking the rice immediately, reducing the oven time so the bottom doesn't stick.
-
4
Sautéing the Rice in Ghee
In another pot, heat 2 tablespoons of ghee and stir the rice in it for 3 minutes over medium heat until the grains glisten and are coated. This keeps the rice grains distinct inside the cream, rather than turning into porridge.
-
5
The First Boil
Pour the hot milk and broth over the rice, add the salt and white pepper, stir, and let it simmer gently uncovered for 5 minutes. Taste for salt now — you won't be stirring again after this.
-
6
Transferring to the Casserole and Adding Cream
Take out the hot casserole and place it on a wooden board or dry towel (not on a cold countertop), pour in the rice with its liquid, and smooth out the top. Distribute the cream all over the top and dot with butter cubes. The cream creates the golden crust and slowly melts down to enrich the rice.
-
7
Baking Without Stirring
Return the casserole to the lower-middle rack and leave it for 60–70 minutes without stirring, until the top is browned with dark golden spots and the liquid has disappeared from the surface. After 45 minutes, insert a spoon at the side: if the rice is still raw and the liquid is gone, pour half a cup of hot milk down the sides, and if the top is browning too quickly, cover it with foil.
-
8
Browning and Resting
If you want a darker top, turn on the top broiler for 3–5 minutes at the end. Take it out and let it rest for 10 minutes before serving — the cream sets, the rice finishes absorbing the liquid, and the clay keeps it warm for a long time on the dining table.


Comments
Cooked it? Tell us how it went, or ask a question — we read every comment.