
Sabae Zainab Egyptian Crispy Semolina Fingers
The secret to crispy Sabae Zainab is that the oil should be on medium, not high heat, so each piece takes 8–10 minutes to turn golden and cook through, and the fingers go straight from hot oil into completely cold syrup. Very hot oil browns the outside while leaving the inside raw, and hot syrup makes the fingers soggy and doughy.
- Prep
- 35 min
- Cook
- 30 min
- Total
- 95 min
- Calories
- 330
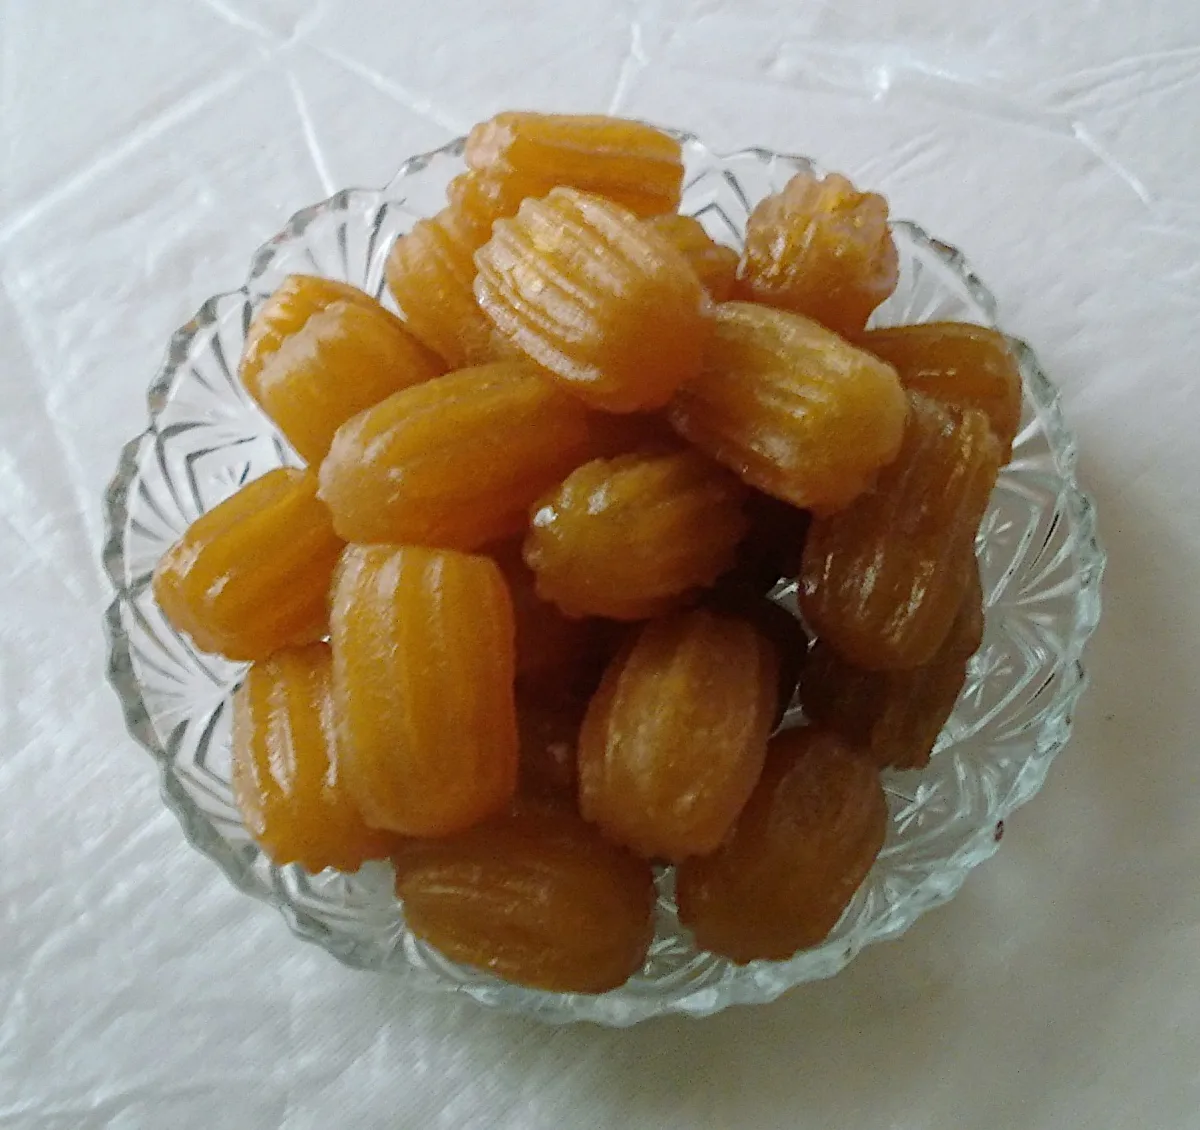
Photo: Maderibeyza / Wikimedia Commons · CC BY-SA 3.0 · https://commons.wikimedia.org/wiki/File:Tulumba_tatl%C4%B1s%C4%B1.JPG
Sabae Zainab is one of Egypt's authentic Ramadan sweets: small fingers made of a flour and semolina dough, patterned on the back of a grater, fried until golden and dipped in syrup. Its ingredients are found in any kitchen, made without an oven or trays, and stay crispy for the second and third days if made correctly.
Method
-
1
Prepare the Syrup First
In a small pot, put 2 cups of sugar and a cup of water and stir until the sugar dissolves. After it boils, add a spoonful of lemon juice and leave it for 8 minutes on medium heat without stirring. Add the rose water and turn off the heat, letting it cool completely — the syrup must be completely cold when dipping, so we make it first to have time.
⏱ 12 min -
2
Rub the Flour and Semolina
In a wide bowl, mix the flour, semolina, sugar, yeast, baking powder, and salt, pour in half a cup of oil, and rub the mixture between the palms of your hands for 3–4 minutes until it looks like wet sand. This rubbing coats the flour grains with oil so the fingers turn out crispy and do not absorb frying oil.
⏱ 5 min -
3
Knead with Warm Water
Add the vanilla, then the warm water gradually while gathering the dough until it becomes soft, cohesive, and not sticky on your hands. Knead for just 2 minutes — excessive kneading strengthens the dough and makes the fingers firm instead of crispy.
⏱ 5 min -
4
Rest the Dough
Cover the bowl and let the dough rest for 30 minutes in a warm place. Resting gives the yeast a chance to work so the fingers are light on the inside and crispy on the outside.
⏱ 30 min -
5
Shape on the Grater
Take pieces the size of a walnut (about 15 grams), flatten them with your finger on the back of a grater or on a fork, and press while rolling until it forms a finger 6–7 cm long. The patterns are not just for looks — they hold the syrup and increase crispiness. Arrange them on a flour-dusted tray.
⏱ 20 min -
6
Test the Oil
Heat oil in a deep pot with a depth of 4 cm over medium heat, and drop in a single test piece: it should produce calm bubbles around it and float after a few seconds without browning immediately. If it browns in less than two minutes, the oil is too hot — lower the heat slightly.
⏱ 5 min -
7
Fry in Batches
Drop the fingers in batches without overcrowding the pot, and stir them gently until they take on a dark golden color in 8–10 minutes. Overcrowding cools the oil, causing the fingers to absorb oil and turn out soggy.
⏱ 30 min -
8
Dip in the Syrup
Lift each batch out with a strainer and drop them hot straight into the cold syrup, stir them for a minute or two until coated, and then lift them onto a strainer to drain excess. Hot with cold is what makes the finger absorb the syrup without getting soggy.
⏱ 5 min -
9
Serving
Arrange the fingers on a plate and sprinkle coconut or pistachios over them if you like, and serve after they have cooled completely — the crunch shows best when they are cold.
⏱ 2 min
Cooked it? Rate it
Your rating tells the next cook whether this recipe is worth their time.
✓ Thanks — your rating is in.
Tips that actually matter
- If the fingers spread or open up in the oil, the dough is too soft: add a spoonful or two of flour to the rest.
- No grater? Use the back of a fork or a wire mesh strainer — the important thing is a surface with ridges to stamp the finger.
- Want them less sweet? Dip them in the syrup for just a few seconds instead of two minutes.
- Add a tablespoon of toasted sesame seeds to the dough if you like the flavor — it provides extra crunch.
People also ask
Why do Sabae Zainab absorb oil or turn out raw on the inside?
Lukewarm oil makes the fingers absorb oil and get soggy, and very hot oil browns the exterior in two minutes while the middle stays raw. The solution is steady medium heat, small batches, and letting the piece take 8–10 minutes. Also, keep the finger the thickness of a small finger — too thick makes it hard to cook through.
Can I make Sabae Zainab without yeast?
Yes: omit the yeast and make the baking powder one and a half teaspoons, and skip the resting time. They will turn out denser and crispier like biscuits, while the yeast version is lighter on the inside.
How many days do Sabae Zainab last, and can I prepare them in advance?
After the syrup, they stay crispy for 2–3 days in a closed container outside the fridge — the fridge makes them soggy. If you want to prepare ahead, shape the fingers and freeze them raw on a tray and then in a bag, and fry them straight from the freezer on slightly lower heat.
Can I bake Sabae Zainab in the oven instead of frying?
Yes: brush them with oil and bake in an oven at 200°C for 20–25 minutes until golden, and pour the cold syrup over them while hot. They will turn out lighter and closer to biscuits, but won't get the crunch of the fried ones or their dark color.
Cook mode
Sabae Zainab Egyptian Crispy Semolina Fingers
-
1
Prepare the Syrup First
In a small pot, put 2 cups of sugar and a cup of water and stir until the sugar dissolves. After it boils, add a spoonful of lemon juice and leave it for 8 minutes on medium heat without stirring. Add the rose water and turn off the heat, letting it cool completely — the syrup must be completely cold when dipping, so we make it first to have time.
-
2
Rub the Flour and Semolina
In a wide bowl, mix the flour, semolina, sugar, yeast, baking powder, and salt, pour in half a cup of oil, and rub the mixture between the palms of your hands for 3–4 minutes until it looks like wet sand. This rubbing coats the flour grains with oil so the fingers turn out crispy and do not absorb frying oil.
-
3
Knead with Warm Water
Add the vanilla, then the warm water gradually while gathering the dough until it becomes soft, cohesive, and not sticky on your hands. Knead for just 2 minutes — excessive kneading strengthens the dough and makes the fingers firm instead of crispy.
-
4
Rest the Dough
Cover the bowl and let the dough rest for 30 minutes in a warm place. Resting gives the yeast a chance to work so the fingers are light on the inside and crispy on the outside.
-
5
Shape on the Grater
Take pieces the size of a walnut (about 15 grams), flatten them with your finger on the back of a grater or on a fork, and press while rolling until it forms a finger 6–7 cm long. The patterns are not just for looks — they hold the syrup and increase crispiness. Arrange them on a flour-dusted tray.
-
6
Test the Oil
Heat oil in a deep pot with a depth of 4 cm over medium heat, and drop in a single test piece: it should produce calm bubbles around it and float after a few seconds without browning immediately. If it browns in less than two minutes, the oil is too hot — lower the heat slightly.
-
7
Fry in Batches
Drop the fingers in batches without overcrowding the pot, and stir them gently until they take on a dark golden color in 8–10 minutes. Overcrowding cools the oil, causing the fingers to absorb oil and turn out soggy.
-
8
Dip in the Syrup
Lift each batch out with a strainer and drop them hot straight into the cold syrup, stir them for a minute or two until coated, and then lift them onto a strainer to drain excess. Hot with cold is what makes the finger absorb the syrup without getting soggy.
-
9
Serving
Arrange the fingers on a plate and sprinkle coconut or pistachios over them if you like, and serve after they have cooled completely — the crunch shows best when they are cold.



Comments
Cooked it? Tell us how it went, or ask a question — we read every comment.